
大家应该都用过jquery-pjax吧,作为前端jQuery时代的必装库,它为前端页面提供了用户体验更好的页面跳转模式,也就是pushState+ajax,但到了2023年的今天,一方面越来越多的前端选择了SPA框架,另一方面再前端工程化的今天,jQuery也已经是过去式了(需要引入jQuery和本体对资源是一个不小的负担)
如果不使用SPA框架,我们实现pjax这种效果的选择就非常少了,虽然也有几个小有名气的pjax独立库,但都是失去维护了老库了。pjax本身的原理并不难实现,我们可以根据需求自定义一个pjax工具库来实现全站的动态更新
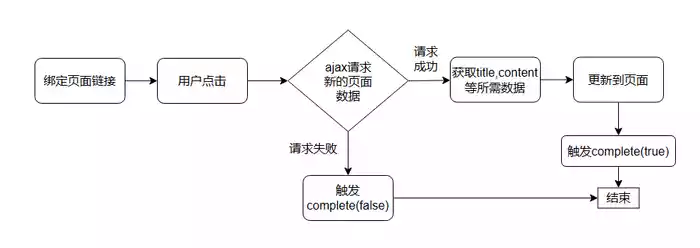
pjax原理
pjax的核心是pushState+ajax,也就是利用浏览器的history.pushState函数实现当前浏览器状态的改变,通过ajax实现新内容的异步获取。pushState是浏览器自带的,我们不需要实现,ajax则需要我们对xhr封装或者使用更新的fetch
实现自定义pjax
我这里在vscode环境给我的hexo博客主题添加全站pjax功能,要求如下:
- 自动绑定页面内的内部且不带target=_blank的链接
- 提供beforeSend和complete接口
- 支持中断,在用户点击了多个链接时选择最后一个链接内容进行处理
代码仅作演示,并不完整,自己实现时注意排错
封装XHR
这里之所以用XHR而不是更方便的fetch,是因为copilot给我的代码,我也懒得改成fetch,大差不差,根据需求来进行个性化的封装
function request(url: string) {
  return new Promise<string>((resolve, reject) => {
    const xhr = new XMLHttpRequest()
    xhr.open('GET', url)
    xhr.send()
    xhr.onerror = function () {
      reject(xhr)
    }
    xhr.ontimeout = function () {
      reject(xhr)
    }
    xhr.onreadystatechange = function () {
      if (xhr.readyState === 4) {
        if (xhr.status === 200) {
          resolve(xhr.responseText)
        } else {
          reject(xhr)
        }
      }
    }
  })
}
我们将XHR封装成一个异步函数,只在请求成功响应时resolve
绑定链接
我们选择页面内的所有链接,并筛选出符合要求的进行绑定,取消默认的click事件来实现我们的方法,我们将对浏览器也页面的控制更新
function convertLinks(opt: Options) {
  const links = document.querySelectorAll('a')

  for (const link of links) {
    // 只监听内部链接, 且不监听同一页面
    if (
      link.host === window.location.host &&
      link.pathname !== window.location.pathname &&
      link.target !== '_blank'
    ) {
      bindLink(link, opt)
    }
  }
}

function bindLink(el: HTMLAnchorElement, opt: Options) {
  el.onclick = (e) => {
    e.preventDefault()

    handlePopState(el.href, opt, el.hash)
  }
}
我们将核心的浏览器状态以及页面更新功能写到一个函数里, 我们通过lastTrigger来实现互斥,防止页面被多次更新。
let lastTrigger: string | null = null

export function handlePopState(
  url: string,
  opt: Options,
  hash?: string,
  push = true,
) {
  if (lastTrigger === url) return
  opt.beforeSend && opt.beforeSend()
  lastTrigger = url
  requestPage(url, opt.container)
    .then((res) => {
      if (!res.targetContent) {
        throw new Error('targetContent is empty')
      }
      push && history.pushState({ url: window.location.href }, '', url)

      scollToHash(hash)

      if (opt.container && lastTrigger === url) {
        const container = document.querySelector(opt.container)
        container && (container.innerHTML = res.targetContent)
        document.title = res.title
        lastTrigger = null
        // 再次绑定
        convertLinks(opt)
        opt.complete && opt.complete(true)
      }
    })
    .catch((err) => {
      console.error('PJAX:', err)
      if (lastTrigger === url) {
        lastTrigger = null
        opt.complete && opt.complete(false)
      }
    })
}
导出
这里我们可以看到我们在ajax发出前会执行history.replaceState, 主要是为了存储一些信息,方便用户在执行前进后退操作时我们进行pjax操作
const pjax = {
  version: '__VERSION__',
  initialed: false,
  connect(opt?: Options) {
    const option: Options = {
      container: opt?.container,
      beforeSend() {
        history.replaceState(
          { url: window.location.href },
          '',
          window.location.href,
        )
        opt?.beforeSend && opt.beforeSend()
      },
      complete(success) {
        opt?.complete && opt.complete(success)
      },
    }
    convertLinks(option)

    if (!this.initialed) {
      window.addEventListener('popstate', (e) => {
        handlePopState(e.state.url, option, '', false)
      })
    }

    this.initialed = true
  },
}
总结
pjax功能的实现不算困难,我的博客已经全站使用了我自己写的pjax,只有1.4kb大小,主要功能经过测试也没有发现什么问题。如果你在优化网站性能,希望减小页面资源文件数量体积的,可以使用该方法来自定义你的pjax